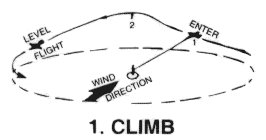
Learning the climb is a basic step that enables the flyer to get the feel of maneuvering the airplane. From level flight, with the wind at your back, apply up-control gradually at point 1. This will cause the airplane to climb rapidly. When it has reached a point where the lines are at about a 45 degree angle at point 2, apply down-control slowly and smoothly so that model is brought down to level flight. Practice this maneuver until the climb can be performed sharply and the leveling off can be accomplished quickly and smoothly before attempting the next stunt.
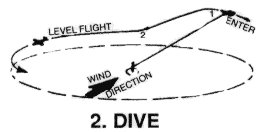
The dive is practiced from high-level flight. Actually, it is the reverse of the climb. From high-level flight with wind at your back, apply down-control gradually, at point 1. This will cause your airplane to dive. As soon as the model starts to dive, apply up-control at point 2, so that the model is brought back to level flight. Practice maneuver until you can dive sharply and level off the model at your desired altitude, BUT NEVER LESS THAN 10 FT., until you become a real expert. Be very careful in this maneuver. If up-elevator is applied a split-second too late, your model may hit the ground before recovery is accomplished.
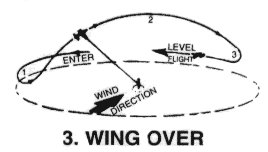
From level flight, apply up-control at point 1, so that the model climbs smoothly to top of circle at point 2. Be certain to note the wind direction since this is the only maneuver that is accomplished into the wind instead of away from it. When you have reached the top of the circle, return the control to the neutral position and the model will continue smoothly around the arc. As soon as the model is on the down side of the arc, at point 3, apply up-control to level off, keeping it at a rather high altitude. Practice this stunt until you can execute it smartly and pull out of the dive at your desired level.

From level flight, with the wind at your back, apply up-control at point 1 until the model climbs to point 2. At this point, apply full up-control and the model will complete the loop sharply. When the loop is completed at point 3, bring the controls to the neutral position and the model will return to level flight. The loop is finished at a high altitude. The model is lowered to the desired altitude by applying down-control slowly. Loops twist the control lines, so do not attempt any more than five loops without landing the model and untwisting the lines. Practice inside loops until you have mastered the art since this is a very important maneuver. Each time the recovery is made, use less up-control at point 2 to enlarge the diameter of the circle until a perfectly smooth round inside loop is obtained and recovery to level flight is at the same altitude that you entered the loop, as shown by the dotted lines.
5. Inverted Flight
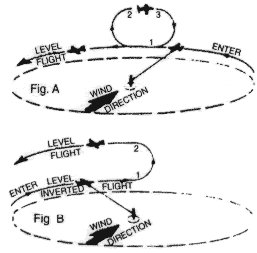
Fig. A. From level flight, apply up-control at point 1 in the same manner as starting an inside loop. When the model is on its back at point 2, apply down-control, slightly PAST neutral. The model will then level out on the top of the loop in an inverted position with the nose slightly up. Hold this position momentarily until you see and feel the model actually flying on its back, then apply up-control at point 3. Recovery is then exactly the same as when making a regular inside loop. Actually, what this amounts to is making a loop, but flattening-out the top.
As you practice and continue to get the feel of inverted flying, the down-control can be held longer at point 2, until you can successfully fly your airplane in an inverted position continuously in level inverted flight. Keep the model high to allow plenty of room for recovery in the event of an emergency. When the model is flying in inverted position, all controls are opposite to the normal. Up now becomes down, and down becomes up. While the model is flying in an inverted position at a high altitude, move the controls slightly in either direction to practice the feel of the reversed controls so that you become used to them. When you have mastered the art of inverted flight, the model can be flown at lower altitudes as desired; until then all inverted flying should be at high altitudes.
All recovery flight via the inside loop method should be made from high altitudes. After you are completely confident in your control, then recovery to normal flight can be made from low level inverted flying as shown in Fig. B, by applying full down control at point 1. This will cause the model to climb right out of inverted flight as shown. Bring the controls to the neutral position as soon as model is right side up at point 2. Be certain the wind is at your back when making these maneuvers.
|